Standard Collections
From Spiffy Stores Knowledge Base
Standard Collections are the work-horse of your store.
A collection is where you bring together all similar products and present them together so that your customers can easily browse and find exactly the right products for them to buy.
Contents
Creating a Standard Collection
You can create a new standard collection from the collections tab in your toolbox.
Creating a Standard Collection

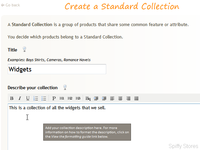
On this page, simple click on the add standard collection button to start creating a new collection.
From there, simply add the Title of your new collection, and add a description of your collection. Once you've created the collection, you'll be able to configure some more options for the collection, such as collection images and specifying the sorting order for the products in your collection.
Once you're ready, click on the Create Collection button to go ahead and create the collection.
Customizing a Standard Collection
Once, you've created your collection, you'll be taken to the overview page for the collection, where you'll be able to add more products, upload some collection images and edit the collection description.
You'll find this page very similar to the product overview page, and you can edit and upload images in exactly the same way.
You can optionally upload images that can be used when your collection page is viewed, but not all themes support collection images by default. Please check your theme settings on the theme editor page to see if your theme has support for collection images.
Adding products to a Standard Collection

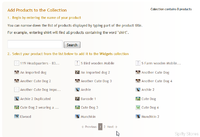
Underneath the collection description and images, you'll find a section which allows you to quickly add products to your collection.
Can can paginate through a list of your products, and click on any that you want to add to the collection. Use the pagination links underneath the list of products to move backwards and forwards through your products.
You can also enter search terms to limit the number of products that are displayed and to help you find the correct products that you want to add to this collection.
Remember also that a product can belong to one or more collections, so you can organize your products in whatever way best suits your needs.
Organizing a Standard Collection
Once you've added a few products to a collection, you may want to organize them so that they display on your store in a particular fashion.
At the bottom of your collection overview page, you'll find a list of the products that belong to that collection.
You can remove any product from a collection, by clicking on the red '-' button at the end of the product line. This removes a product from the collection, but it doesn't delete the product, so if you change your mind, you can always add it back into the collection.
To the left of the delete button, you 'll find a four-pointed drag symbol which you can use to drag your product up and down in the list to manually change the order in which the products appear in the collection. Just hover your mouse over the symbol until the cursor changes showing you that it's ready to start dragging. Click and hold down your left mouse button and while keeping the mouse button down, drag the product line up or down until you find the right position in the list for the product. Once it's in the right position, just release the mouse button, and the product will drop into its new position in the list.
Sorting your Collection
Organizing a Standard Collection

We can help you organize your collection a bit faster than this, so you don't need to drag and drop every product into the right position.
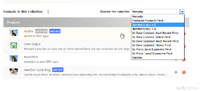
In the top right-hand corner above the list of products, you'll find a drop-down selection box with a bunch of options that you can use to sort your collection quickly. Just click on one of the options in the box, and your collection will be re-ordered using the desired sorting order.
Even after you've sorted your products in this way, you can still manually drag around the products to finalize their display order. For example, you may want to see your featured products first in the list, but maybe you have a preference for which product should be at the top of the list. Just choose the Featured Products First option in the list, and then when the re-ordering has finished, just drag the product you want to the top of the list.
When a collection is sorted Manually, it means that you choose the order of the products manually as described above. When you choose to show Featured Products First, all your featured products are shown at the top of the list, but the remainder of the products are listed in the same order as if they were sorted manually.
This can cause some difficulties when you have to deal with large numbers of products, as there is a limit to the number of products that can be managed manually in the Toolbox.
In order to improve your ability to manage large numbers of products in a collection, the manual ordering of your products is automatically updated whenever you choose a different sort option, such as Alphabetically: A-Z. This means that if you switch back to a Manually ordered collection, then the collection will maintain the alphabetic ordering that you chose previously.
When a collection is sorted Manually, then the order of products is never updated. If a new product is added to the collection, then it appears at the bottom of the list. If you choose one of the other sorting options, then the order of the products will be updated as the products in the collection change.
Finally, if you manually order your products, then choose to show Featured Products First, the order of the products will never change.
If you would like to maintain a sorting order, such as alphabetic or by creation date, but still show featured products first, then you need to choose the sorting order you require first, then select the Featured Products First sorting option. In this case, the collection will maintain the sorting option you chose first, but with the featured products at the top of the list. As new products are added to the collection, they will be displayed in the correct position for the sorting option you chose before selecting Featured Products First.
We'd recommend trying out the various sorting options described here to see how they work, so that you can easily understand the best way to take advantage of how your products are displayed.
Previewing your Standard Collection
Finally, once you've added all the products to your collection, you can see what they look like on your store front by clicking on the preview collection button at the top of the side-bar.
Once you've created a collection, you will need to add it to a menu so that your customers can find the collection of products. Just go to the store menus tab and add your collection to one of your menus.